Shortcut
LED Technical
Gerneral Information | Application note | ABSOLUTE MAXIMUM RATINGS | CHARACTERISTICS CURVES | LED part No system
HOW TO USE LED
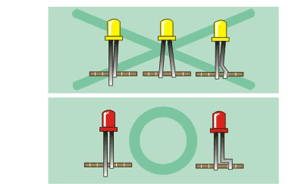
·FORMING:
Please do not form the LED after soldering .If forming id necessary ,it must be done before soldering .
Any unsuitable stress applied to the epoxy may break bonding wires in LED.
·SOLDERING:
Soldering Bath ---260℃±5 ℃ within 5 seconds: Soldering Iron-Under 30W within 5 seconds.(1.6mm from epoxy body)
Do not apply any force of mechanical stress onto the leads or epoxy body during soldering heat is remained.
If soldering one line of LED on a P.C . board by using a soldering iron ,don t solder both the leads of the LED at same time .
·CLEANING:
Use Alcohol ,Freon TE or Chlorosen to clean LED at normal temperature for less than l minute .
Do not use unspecified chemical liquid because it may cause crack or haze on the epoxy body.
·PREVENTING OVER CURRENT :
In order to operate LED in stable condition , please put protective resistors in series.
Resistor value can be determined by the formula
R= WHERE:
Vs=Source Voltage
VF=Forward Voltage
If=Recommended Current of LED (10-20mA)
·BRIGHTNESS:
For the purpose of obtaining uniform brightness, LED shall be same current.
It is useful for uniform brightness if you use larger source voltage and protective resistor .
Cleaning 
|
|
Forming
|
|
Soldering
|
|

| ABSOLUTE MAXIMUM RATINGS (TA=25oC) |
If | Pd | Vr | IPF | TOPR | TSTG | TSOL |
| mA | mW | V | mA | oC | oC | oC | |
| H | 25 | 60 | 5 | 150 | -40 to +80 | -40 to +85 | Max.260±5℃ for 3 sec Max. (1.6mm from the base of the epoxy bulb) |
| E | 25 | 60 | 5 | 150 | |||
| Y | 25 | 60 | 5 | 150 | |||
| G | 30 | 65 | 5 | 150 | |||
| SR |
25 | 60 | 5 | 150 | |||
| LR | 25 | 50 | 5 | 150 | |||
| UR | 25 | 60 | 5 | 150 | |||
| UE | 30 | 65 | 5 | 150 | |||
| UY | 30 | 65 | 5 | 150 | |||
| UG | 30 | 75 | 5 | 150 | |||
| PG | 30 | 110 | 5 | 150 | |||
| BG | 30 | 110 | 5 | 150 | |||
| B | 30 | 120 | 5 | 100 | |||
| UB | 30 | 120 | 5 | 100 | |||
| UV | 30 | 120 | 5 | 100 | |||
| W | 30 | 120 | 5 | 100 | |||
| W | 30 | 120 | 5 | 100 |
Parameter
Forward Current IF
Power Dissipation Pd
Reverse Voltage VR
Peak Forward Current IPF (Duty 1/10 @1KHZ)
Operation Temperature TOPR
Storage Temperature TSTG
Lead Soldering Temperature TSOL
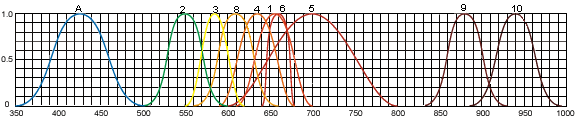
| Wavelength(nm) | RELATIVE INTENSITY Vs WAVELENGTH (λP) |
| 1 655nm/Red 2 568nm/Yellow Green 3 585nm/Yellow 4 635nm/Orange 5 700nm/Bright Red |
6 660nm/super Red 8 610nm/Amper 9 GaAIAS 880nm 10 GaAS/GaAS & GaAIAS/GaAS 940nm A 430nm/Blue, 470nm/Blue |
  |
 |
 |
PDF DATASHEET
We will provide customer the useful information for marketing and for technical while customer get one password from us. it may download our brochure, our marketing material, our presentation, and other material novelty